About concept47

Ruby/Rails/Jquery/MySql/PostgresSQL hacker. Wannapreneur. Love to build beautiful things.

Making tricky things easy …

Today I was on amazon looking for some technical literature (about Kubernetes if you’re wondering), when I suddenly wondered if there was a newer version of my old amazon firestick available …

There was.

All of a sudden … I switched to wondering how I was going to avoid being stuck with trying to offload an extra (older) firestick during a pandemic … when I see this …

When I hit that button, amazon showed me the exact order with my older firestick, offered me a 20% discount and all I had to do was drop it off at the UPS center. The only thing left to do was say … “yes, take my money”.

I did.

Making tricky things easy for your users will never go out of style.

How to disable swap usage on Mac OS and why you should do it (in 2020)

I just got myself a Macbook Pro with 32GB of RAM.

So imagine my surprise when after a few days of running it, I looked at my memory in activity monitor and noticed that I was running with almost 14GGB of swap ?!?!? (It eventually ballooned to 32-35 GB of disk at one point)

This had been a recurring theme on my old machine with 16GB of Memory. The swap would increase up to 16GB sometimes, as much at 19-20GB+ and I couldn’t understand why. I just assumed that when I got more memory the problem would go away.

So after asking around on twitter, I started doing some research on possibly turning off my swap file. This may seem drastic, but many years ago when I was still a Windows user, I’d managed to do the same thing without much ill effect, so I figured … why not?

The instructions and a detailed explanation of what you’re doing are here. But the long and short of it is that you need to boot into recovery mode and then run the command

sudo nvram boot-args="vm_compressor=2"

When you boot back into MacOS, you can check that you are running in this mode by running this command

$ sysctl -a vm.compressor_mode

to which you should see this in response
vm.compressor_mode: 2

At first I was very nervous about running out of memory, but then I noticed something interesting. MacOS was still using swap!!!!

I was bummed, I thought I’d gotten it wrong somehow ?, but I hate rebooting my machine so I left things alone and continued to monitor memory/swap usage.That’s when I realized something interesting … My swap file usage wasn’t disabled, it was just now extremely conservative. I’ve been using this for almost a month now and the most swap I’ve ever seen it use is 300MB.

This is my current system swap usage

MacOS running with swap "disabled"

MacOS running with swap “disabled”

Amazing right?!

Its exactly what I wanted, and I’ve run so far without any memory errors or problems. And that’s while I am also using Memory Clean 3, to help me occasionally reclaim memory. I’ve used Memory clean for years and just recently upgraded.

I must mention that I’m not doing anything particularly stressful like video editing, gaming. Just running a couple of docker containers and running some Rspec tests from time time time, so your mileage may vary. If you do turn on conservative swap file usage on MacOS please report back or tweet at me to let me know how it goes!

Update: 10/23/20
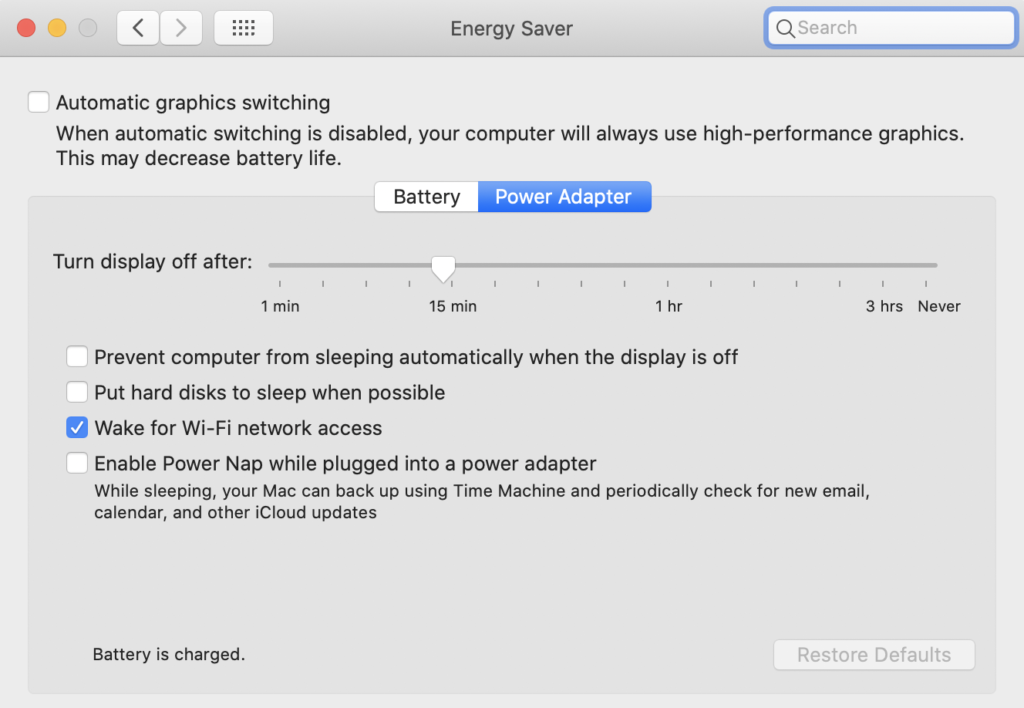
I found that enabling “Automatic Graphics switching” in the Energy Saver section of System preference made the system use up more RAM.

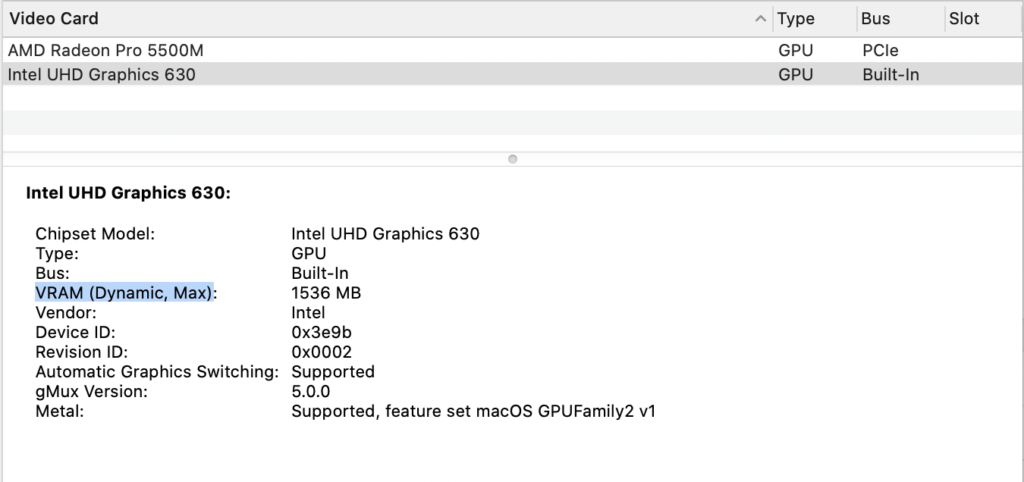
This makes sense, the dedicated AMD Radeon Pro 5500 GPU on my Macbook Pro has 4GB of its own dedicated GDDR6 memory (VRAM), so it makes sense that the integrated graphics system uses RAM when it needs to. 

Apple appears to have fixed the usage of RAM by the integrated graphics to to 1.5GB
Unfortunately this seemed to put lots of memory pressure on my system after a few days, to where I’d see the occasional crash.

So for now I have disabled this option, and my system seems more stable now as my Macbook Pro uses the GPU memory exclusively and doesn’t touch my RAM 🙂


Best way to install postgis for Postgres versions lower than 9.6.x? from source.

I recently had an absolute bear of a time trying to install the postgis extension for Postgresql 9.6.3 which I’m running because there is an error on upgrade from 9.6 to 10 around the hstore extension which seems impossible to get over unless I blow away all the data related to hstore or try this very tricky migration that basically massages hstore data.

First I tried to simply install postgis with homebrew. Silly me.
That upgraded my 9.6.3 installation to Postgress 11 and installed the extension. It took me 2 hours to pick through the debris, (dyld errors, had to ln -s the new readline library to the old one that postgres expecting after I ran
brew switch postgres 9.6.3

After that, I was able to install postgis with brew via two commands

brew pin postgres
and
brew install postgis --ignore-dependencies

That looked like it worked, but everytime I then tried to install the extension I’d get and error around this phrase (I lost the stacktrace in my glee of finding a fix)

Symbol not found: _AllocSetContextCreateExtended

I turns out what I had to do was uninstall postgis from brew

brew remove postgis

then go to the official postgis source page, pick a stable version (I had issues with 2.4.7. compile error on Mac OS) but 2.5.3 worked just fine.

I downloaded the tar file, uncompressed it then ran
./configure
make
make install

And VOILA! I was able to create the postgis extension for the db I was working on. phew!

recovering from git reset –hard

You’ve been there … you’ve done some work, then staged or committed it in git and forgotten about it for a bit. Only to hop into the terminal another day thinking you’re on master and wondering why your git pull is doing a merge.

Having neither the time, or patience since you’re running low on coffee and you want to look at that Pull request locally, you’ve run

git reset --hard origin/master

only to instantly remember you’ve blown away all that good work.

The good news is, you can recover from git reset error in very specific instances as described here

I accidentally ran git reset --hard on my repo today too while having uncommitted changes too today. To get it back, I ran git fsck --lost-found, which wrote all unreferenced blobs to <path to repo>/.git/lost-found/. Since the files were uncommitted, I found them in the other directory within the <path to repo>/.git/lost-found/. From there, I can see the uncommitted files, copy out the blobs, and rename them.

Note: This only works if you added the files you want to save to the index (using git add .). If the files weren’t in the index, they are lost.

In the case (like mine) where you committed the changes previously, you will find hashes in .git/lost-found/commit that refer to the commits that you lost. You can view what is in them by running

`git show 98b9e853c9c8ffc07b450c61b05313cc4aa9eceb` (for example)

Usually it will just show the diff of the commit which you can re-apply manually line by line, other times you’ll see something like this

commit 98b9e853c9c8ffc07b450c61b05313cc4aa9eceb
Merge: c5060f1 89e959d
Author: xxxxxx <xxx@xxxxxx.com>
Date: Thu Jul 13 17:42:09 2017 -0500

Merge branch ‘master’ of https://github.com/xx/xx xx/update-readme

on the line that says “Merge”. You can run a git show on one or both those hashes as they point to the parent commits of the one you’re looking at.
You can keep doing that till you get the commit you were looking for. whew!

puma-dev on OSX follow up (tips and tricks)

I’ve been doing a lot more Rails dev recently, and as I wrote about previously, I’ve really been enjoying using puma-dev to do that. I just wanted to add a couple of things to that initial post that may not be initially apparent.

Getting puma to stay idle longer

Out the box, puma-dev will spin down an app after 15 minutes of inactivity. This was a bit short for my tastes so I went asking around for how to extend this. Turns out you can run a simple command …

puma-dev -install -timeout 180m

On OSX this actually updates the plist file that launches puma-dev directly. which brings me to the next point …

Restarting puma-dev manually

On OSX. The puma-dev plist file used by launchd to run puma-dev on startup, seems to be located at /Users/<your username>/Library/LaunchAgents/io.puma.dev.plist

The reason why this is important is that in the puma-dev readme, it says to restart puma-dev by running.

pkill -USR1 puma-dev

However. Lets say, you’ve misconfigured your plist file (like I managed to do), launchd will keep trying to run puma-dev and failing all the while spitting out an error that looks like this in your puma log files every ten seconds

Error listening: accept tcp 0.0.0.0:0: accept: invalid argument

The dead giveaway is entries like this in your system log files located at /private/var/log/system.log

io.puma.dev[1616]): Service exited with abnormal code: 1
Service only ran for 0 seconds. Pushing respawn out by 10 seconds

To stop this just run this command


launchctl unload /Users/<your username>/Library/LaunchAgents/io.puma.dev.plist

This will let you fix up your plist file. Then you can restart it with this command

launchctl load /Users/<your username>/Library/LaunchAgents/io.puma.dev.plist

You can also use this as a way of starting and restarting puma-dev.

Running on a different port

If you have Apache running on port 80 and don’t pass in the right command when installing then puma-dev will fail to launch, and keep failing as described above.

This means you have to run `puma-dev install` with the http-port flag, for example

puma-dev -install -http-port 81

I like this, not for the reason you’d think, but because it allows me access my apps on https://<appname>.dev, while still accessing my php apps with apache on port 80!

Something to note though is that you have to run this command everytime you run `puma-dev install`, or else it will overwrite your settings in your plist file and cause you hours of grief as you try to figure out how you broke all the things amidsts rending of hair and gnashing of teeth

To illustrate … say you have your port set to 81 and you run the command we discussed first

puma-dev -install -timeout 180m

This will reset your port to 80 quietly, and puma-dev will start failing as I described previously. so to avoid that you want to run

puma-dev -install -timeout 180m -http-port 81

instead.

This behavior is subtle enough to cause problems for someone who may have installed puma-dev a while ago and forgotten where everything is and how it all works, so I filed a bug report about it.

Hope this helps someone avoid a stressful afternoon or two!

Fixing the Ruby reject! method

Fun look at the bug/bugfix that caused the Ruby reject! method to go from linear complexity – O(n) – to quadratic complexity – O(n^2) – starting in Ruby 1.9.3*

*Since fixed in Ruby 2.3

http://accidentallyquadratic.tumblr.com/post/157496054437/ruby-reject

Rails dev with puma-dev

A few months ago the creator of my favorite rails server (puma) announced a version of puma called puma-dev. This new server bears more than a passing resemblance to pow, because of its goal of making local rails development stupendously easy.

I was a big fan of pow when it first came out but I eventually stopped using it when it as development on it slowly crawled to a halt then eventually stopped. Having come to Rails development from a PHP background, where the server was always available,

  • I didn’t like having to type `puma` or `rails s` to start working on a local application, or …
  • having to remember and assign different port numbers if I was working on more than one app at a time. So I was definitely excited about having puma-dev pick up where pow left off.
  • it also made playing around with subdomains easier

So I was definitely looking forward to having it pick up from where I left off with pow

Setup is super easy. First make sure to include puma in your Gemfile

gem 'puma'

Then run `puma` at the command line and make sure your app starts up with no problems.
Next install puma-dev

brew install puma/puma/puma-dev
sudo puma-dev -setup
puma-dev -install

To setup yourdomain.dev (for example), you’d just run

puma-dev link yourdomain /path/to/your/app

And voila!

I’ve been using this setup for a few months now, and I must say, I find this immensely useful because I have an apache server running on port 80 for my PHP work, so I can actually access a domain on https://mydomain.dev. It also supports websockets!

Things to note

  • puma-dev will spin down the server after a few minutes of inactivity, so don’t be surprised if your app takes a few seconds to startup after you’ve been gone for a while
  • To restart the server (in case you’re working on something that doesn’t auto load or isn’t loading correctly)  just run `touch tmp/restart.txt` from rails root

json (1.8.3) and rubyracer gems aren’t compatible with ruby 2.4.0

PS: This is moot anyway because it looks like Rails 4.2 doesn’t fully support Ruby 2.4.0 yet

Ran into this problem trying to upgrade a Rails app to use the new version of Ruby.

make "DESTDIR="
compiling generator.c
generator.c:861:25: error: use of undeclared identifier 'rb_cFixnum'
} else if (klass == rb_cFixnum) {
^
generator.c:863:25: error: use of undeclared identifier 'rb_cBignum'
} else if (klass == rb_cBignum) {
^
generator.c:975:5: warning: division by zero is undefined [-Wdivision-by-zero]
rb_scan_args(argc, argv, "01", &amp;opts);
^~~~~~~~~~~~~~~~~~~~~~~~~~~~~~~~~~~~~

Yikes!

Turns out this is because of Bignum/Fixnum integration that rolled out in ruby 2.4.0

after that I hit another fugly stack trace caused because I hadn’t upgraded therubyracer gem to 0.12.3

I had to include the gems and specific versions in my gemfile

gem 'json', '~> 1.8.6'
gem 'therubyracer', '~> 0.12.3'

then run

bundle update json

Unfortunately, as I mentioned above, I was unable to run Rails 4.2.7 anyway, because it looks like it hasn’t been fully prepped to incorporate Ruby 2.4.0’s integer changes.

Suddenly failing `rvm install`command on os x 10.11 (El Capitan)

This actually started with a strange error, when I went to fire up a rails server in an app I’d been working on the night before.

Unable to load application: LoadError: dlopen(/Users/xxx/.rvm/rubies/ruby-2.3.0/lib/ruby/2.3.0/x86_64-darwin14/readline.bundle, 9): Library not loaded: /usr/local/opt/readline/lib/libreadline.6.dylib

Like I mentioned, I’d fired up this app less than 24 hours prior, so this was very strange to me. Some quick googling around suggested that I try to reinstall my ruby version so I ran the command

rvm reinstall 2.3.0

Well that errored out with another strange error

ruby-2.3.0 - #configuring...........................................................
ruby-2.3.0 - #post-configuration.
ruby-2.3.0 - #compiling...........
Error running '__rvm_make -j 1',
showing last 15 lines of /Users/xxx/.rvm/log/1476345601_ruby-2.3.0/make.log
compiling enc/trans/newline.c
compiling ./missing/explicit_bzero.c
compiling ./missing/setproctitle.c
compiling dmyenc.c
linking miniruby
dyld: lazy symbol binding failed: Symbol not found: _clock_gettime
  Referenced from: /Users/xxx/.rvm/src/ruby-2.3.0/./miniruby (which was built for Mac OS X 10.12)
  Expected in: /usr/lib/libSystem.B.dylib
 
dyld: Symbol not found: _clock_gettime
  Referenced from: /Users/xxx/.rvm/src/ruby-2.3.0/./miniruby (which was built for Mac OS X 10.12)
  Expected in: /usr/lib/libSystem.B.dylib
 
make: *** [.rbconfig.time] Trace/BPT trap: 5
++ return 2
There has been an error while running make. Halting the installation.

You might notice the “(which was built for Mac OS X 10.12)
which is a bit of a hint at what the problem is.

Because the last line hints the problem is with make, I decided to reinstall make with brew and it dumped the solution to the problem in my lap

brew install make
Warning: You have Xcode 8 installed without the CLT;
this causes certain builds to fail on OS X El Capitan (10.11).
Please install the CLT via:
sudo xcode-select --install

Basically I’d upgraded my Xcode version without installing command line tools. Once I ran this command, my rvm reinstall went fine and my readline problems went away.

Managing Talent that doesn’t fit between the lines

One of the most interesting management insights I’ve read in a while.

https://www.quora.com/I-have-a-staff-member-who-produces-brilliant-work-but-is-consistently-late-every-single-day-I-cant-fire-him-because-it-will-take-months-to-find-someone-to-fill-his-position-What-can-I-do/answer/Dushka-Zapata?srid=OmPr

the key insight being

People who deliver brilliant work are hard to come by.
It’s our job as managers to make our business environment flexible enough to give  every brilliant employee a place to thrive.

I absolutely loved this!

All too often, I find that managers (especially middle managers) are concerned with bringing employees “in line” and getting them to conform to the system, instead of figuring out how to help them do their best work. I imagine following the approach outlined in the article is much easier said than done though.

PS: I bet it would make a very interesting interview question for a management position.

what subdomains taught me about questioning my assumptions

A couple of years ago I worked at a “startup”.  I put startup in quotes because it was really a big company pretending to be a small one. Ideas generally flowed from the top down; engineers wound up on the crap end of everything, usually getting overruled and dictated to by PMs and the UX team. Naturally, a lot of the engineers were disillusioned and frustrated with the way things were working.

It was in the middle of this rather cynical time that we got a new PM on the team. He was tasked with improving our onboarding flow and upping conversion numbers, and I was the engineer assigned to work with him on this project.

He had a lot of ideas about how to go about accomplishing this task, and surprisingly, he had actually dug around in the database and pulled some numbers that backed up the direction he was going in (before he came along, very little of what we did was based on data … another source of frustration).

However, on the list of things he wanted to try was something that raised my eyebrow.

“Hey … Pete” (not his real name by the way)
“Hey!”
“Am I reading this right? You want us to leave off the subdomain field on signup?”
“Yes”
“So how will we assign subdomains to the client to access and login to their app?”
“We can just randomly generate a unique string and use that, I think”
“hmmm”

To provide some context, this was 2013, and the subdomain-login-access pattern where a customer was actually a group of people who needed separate logins to access a particular space within an app, had become a mainstay of web apps all over the techie world. The pattern, popularized by 37 Signals and Basecamp almost 8 years earlier, was simply one of those things that everyone just did.

Being the brilliant undiscovered product genius I thought I was at the time, I knew taking away subdomains from the signup form, would be an unqualified disaster. Users would freak out when they signed up and were redirected to random5tring35.app.com to login. They would panic when they couldn’t remember what url to go to login, they would bombard us with emails, and the complaints would force us to roll back this silly change.

I smirked to myself and got to work on getting this and other changes pushed out on the appointed date. After getting everything built out and QA’ed in staging, we rolled out the change and waited …

I’ll spare you the suspense … nobody complained about the subdomains

I was completely blown away. I simply could not understand it … I mean, subdomains were so crucial to the users, how could they not miss that on the sign up?!?!?

Turns out that subdomains are actually confusing for a lot of users, and us taking that off their plate simplified the sign up process. Users mostly didn’t care what the url looked like, and the ones that did, could request a specific one in the settings. (A few years later, 37 Signals would remove subdomains in the newest versions of their apps, citing the exact rationale that we discovered back then)

I learned 2 things that day
– Humble pie is actually pretty delicious, people should eat it more
– You know nothing Jon Snow. (Seriously. You don’t)

Lots of us walk around spouting truisms without any data to support what we’re talking about, and nobody challenges us, so we keep doing the things we’re doing. In reality, if we poke a couple of these “assumptions” we might find that a lot of them come tumbling down like a Jenga tower.

So, whenever you find yourself not wanting to try something because “everyone knows thats how its done”, take a breath then go ahead and test that assumption.

If you’re correct what do you have to fear?

Loved this post on hiring from Coding Horror

http://blog.codinghorror.com/we-hire-the-best-just-like-everyone-else/

Perhaps worst of all, if the interview process is predicated on zero doubt, total confidence … maybe this candidate doesn’t feel right because they don’t look like you, dress like you, think like you, speak like you, or come from a similar background as you? Are you accidentally maximizing for hidden bias?

“Product management is the art of knowing what to build”

Loved this little gem of a quote hidden inside the following article

“Product management is the art of knowing what to build”

Feels like one of those “Everybody knows that” things from the Geico commercials, but from experience, fewer people than you’d imagine know this.

http://techcrunch.com/2016/01/18/why-big-companies-keep-failing-the-stack-fallacy/